 Introduction
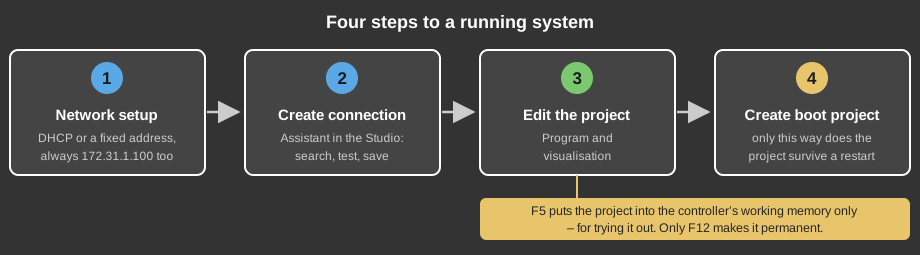
This page describes the way from the delivered controller to a project that
the controller loads again by itself after a restart.
1. Bringing the controller into the network
- DHCP: The controller is
delivered with the network setting DHCP by default. If a DHCP server is
available in the network, the controller automatically receives an IP
address from your network. The Studio can then find the controller in
the network automatically.
- Static IP address: In
addition the controller has a virtual static IP address 172.31.1.100.
Using this IP address the controller can always be reached in the
network, even if no DHCP server is available. In this case give the PC
an IP address from the same network as well, for example
172.31.1.200/24. The virtual address is only meant for configuration
and not for continuous operation.
In this example it is assumed that the controller is set to a fixed IP
address.
Enter the IP address of the controller in the browser, or 172.31.1.100 if
no DHCP server is available. A query for user and password follows, the
default settings are "admin" and "z-server". See also description
of the web interface.
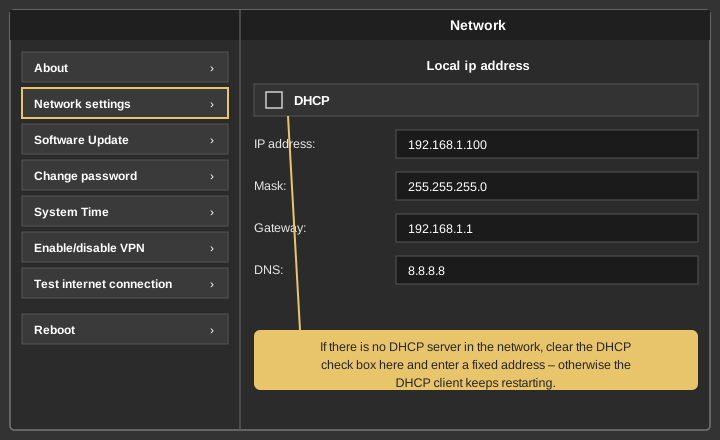
Under "Network settings" the settings can be adapted to the local network.
The changes take effect after a restart of the controller.
Note: As soon as the Studio is
connected to the controller, the same settings can also be changed there in
the menu Control / Network settings – the web interface is therefore
not needed for day-to-day operation.
Important: If the controller is set to DHCP and no DHCP server is
available, a static IP address must always be set as well. Otherwise there
will be interruptions when connecting via 172.31.1.100, because the DHCP
client is restarted cyclically as long as no IP has been assigned via
DHCP.
2. Connection from the Studio
Now start the Studio on your PC and create a new project. To establish a
connection to the controller, a connection must be created in the project.
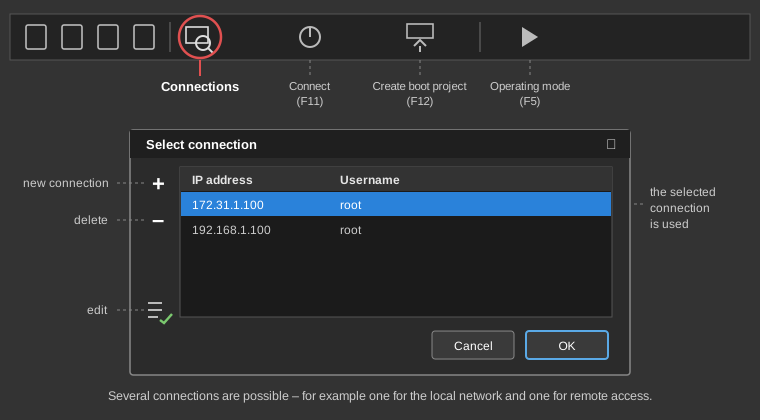
To do this, click the symbol "Connections" in the toolbar – the same
dialog is also available in the menu Project settings / Connections. Create
a new connection there with "+":
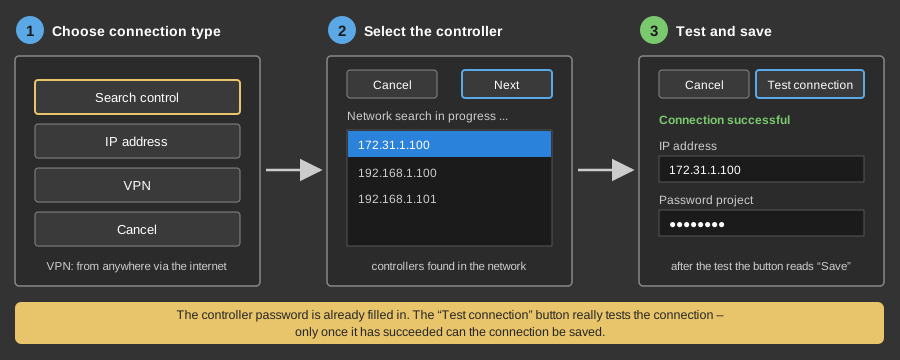
The wizard for setting up a connection is displayed. It leads to the goal
in three steps:
Besides the network search the wizard offers two further ways:
- IP address: The address of
the controller is entered by hand. This is the way to go if the network
search finds nothing or if the controller is located in a different
network.
- VPN: The connection runs via
the uni-PRO VPN server and also works when you are away. Email and
password of the VPN account are entered, see VPN.
The wizard is the same in Studio and APP. A detailed description of all
connection types can be found under APP –
Setting up a connection, the management of the connections under Project
settings – Connections.
The connection that has been set up is displayed in the dialog. In this way
several connections can be set up, for example one for the local network
and one for remote access. The connection selected in the dialog is always
the one being used.
Tip: If the controller is not found
automatically, this can have the following causes:
- The PC running the Studio and the controller are not in the same
network (check IP address and network mask). In any case the web
interface of the controller must be accessible via the browser.
- A firewall or a virus scanner on the PC blocks the answers of the
controller to the network search. If Windows asks at the first start
whether the Studio may access the network, access must be allowed.
- Programs such as virtual Box install their own network adapters under
Windows, then it can happen that the controller is not found.
- If a VPN is running on the PC, for example to connect to the
internet, the controller may not be found.
- With certain network configurations such as LAN + WLAN there may also
be problems. For the initial setup it is recommended to operate
controller and PC in the same network (wired) and to switch off
WLAN.
- If certain router configurations do not let broadcast messages pass,
the controller will not be found either.
It is always possible to give the controller a static IP address and to
enter it manually via "IP address". Alternatively the connection can be set
up via VPN – this works independently of the network search.
3. Editing the project
After the connection to the controller has been set up, you can start
working on the project. See also
- IO Configuration
- Program Editor
- Visualization Editor
4. Transferring the project to the controller
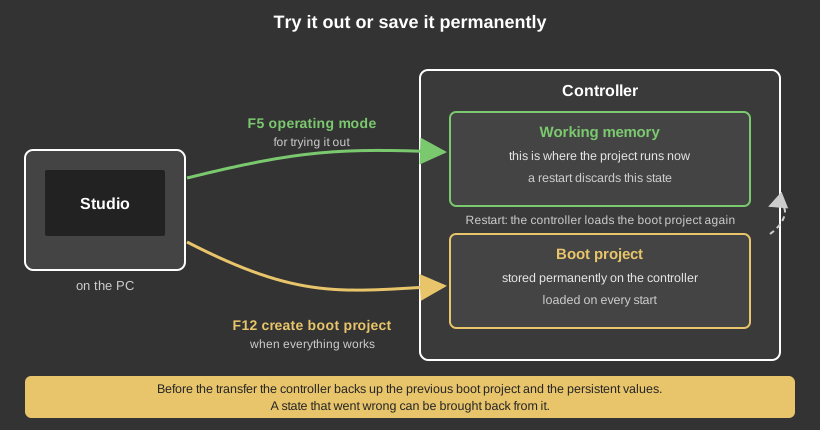
The project reaches the controller in two ways – once for trying it
out and once permanently:
By switching between editing and operating mode (F5) the changes are
transferred into the working memory of the controller and run there
immediately. If you restart the controller, it loads the boot project saved
last. If you have made a mistake, it is enough to restart the controller in
order to continue working with a functioning state.
If you are sure that all changes work, the project must be saved
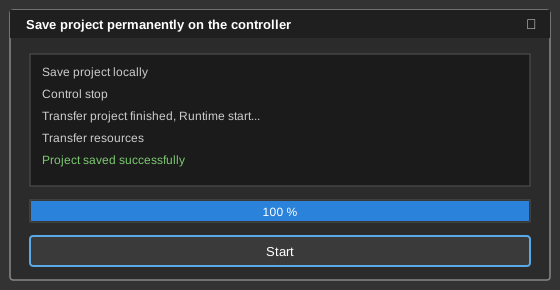
permanently on the controller. To do this press "Create boot project" (F12)
in the toolbar, also to be found in the Control menu. The following dialog
is then displayed:
Click Start to save the current project permanently on the controller. The
controller is stopped briefly during this and afterwards continues to run
with the new project.
Before the new boot project is transferred, the controller creates a backup
of the previous project together with the persistent values. A state that
went wrong can therefore be brought back via the menu Control / "Restore
backup...", see Restore backup.