 Projekt
settings - Connections
Projekt
settings - Connections
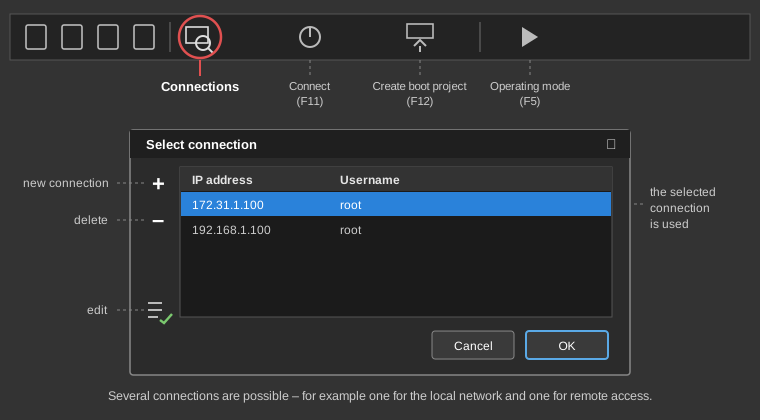
In this dialog the connections to the control can be managed. To establish a
connection to the controller, a connection must be created in the project.
To do this, click the Manage connections icon in the toolbar and click Add
to the connection settings:
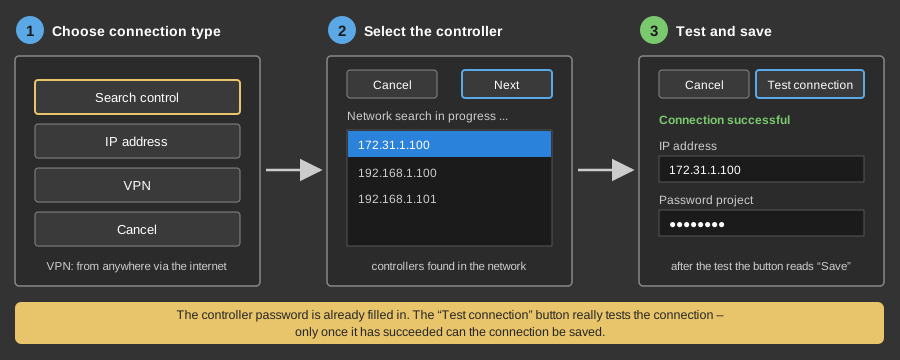
The wizard for setting up a connection is displayed:
With Search control the wizard lists all controllers in the
network. Select the desired one and click Next – its data are
then taken over. Test connection checks whether the connection
comes up; after the message “Connection successful” finish
with Save.
The new connection is displayed in the dialog. In this way, several
connections can be set up, for example one for the local network and one for
remote access.
Besides searching for the controller, the wizard also offers the
connection types IP address, VPN and Demo. A detailed step-by-step
description of all connection types can be found under APP
- Setting up a connection – the connection wizard is
identical in the APP and in the Studio.
Important: The controller
can always be reached under the IP address 172.31.1.100. If the controller
is set to DHCP and no DHCP server is available, a static IP address must
always be set. Otherwise, there will be interruptions when connecting via
172.31.1.100 because the DHCP client will be restarted cyclically as long as
no IP has been assigned via DHCP.
Tip: If the control is not found
automatically, this can have the following causes:
- The PC running the studio and the controller are not in the same
network (check IP address, network mask), in any case the web interface
of the controller must be accessible via the browser.
- Programs such as virtual Box install their own network adapters under
Windows, then it can happen that the controller is not found.
- If a VPN is running on the PC, for example to connect to the Internet,
the controller may not be found.
- With certain network configurations such as LAN + WLAN, there may also
be problems. For initial setup, it is recommended to operate the
controller and PC in the same network (wired) and to switch off WLAN.
- If certain router configurations do not allow broadcast messages to
pass, the controller will not be found either.
- A firewall or virus scanner on the PC can block the controller's
replies to the network search. If Windows asks on first start whether
the Studio may access the network, access must be allowed.
It is always possible to give the controller a static IP address and enter
it manually in the connection settings. Alternatively, the connection can
also be set up via VPN – this works
independently of the network search, also while on the road.