 Variables
Variables
VariablesAs a presentation: Addresses and links - an overview on a few slides, also suitable for training (arrow keys to browse, F for full screen).
All variables of the project are managed in the variable window. It sits at the bottom right and is opened with the tab Variables – next to it is the tab Navigation with the pages.
Creating variables
Properties
Context menu
Send / read value
Address monitoring
Persistent variables
Linking automatically
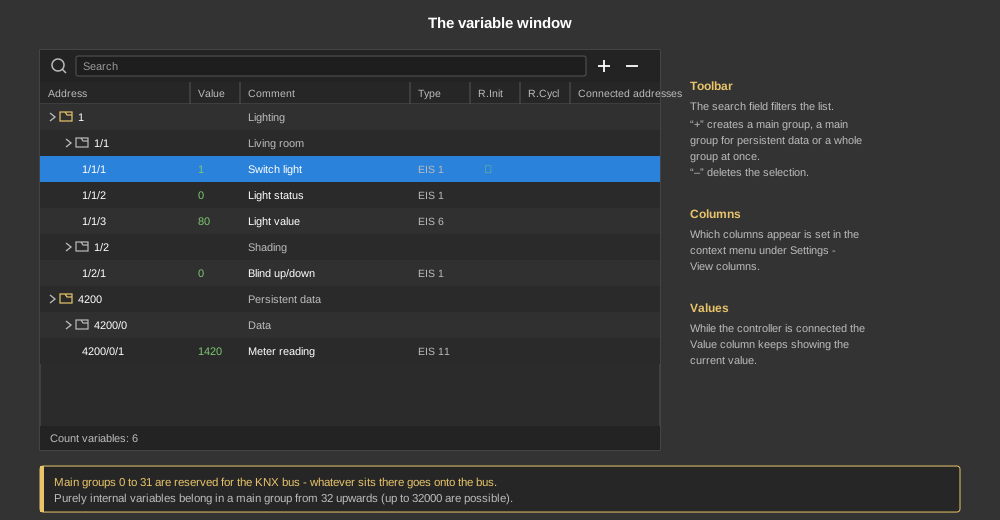
A variable consists of three parts: main group, middle group and subgroup. This division comes from KNX. Unlike there, groups up to 32000 are possible here.
Important: The main groups 0 to 31 are reserved for the KNX bus. Everything that sits there is sent onto the bus – provided a KNX interface exists. Variables that are only needed inside the controller therefore belong in a main group from 32 upwards.
The “+” symbol in the toolbar of the variable window opens a menu with three entries:
| New main group | Creates a main group with number and name. |
| New main group for persistent data | Creates the main group 4200 Persistent data together with a middle group. All variables below it are stored permanently in the controller, see Persistent variables. The entry only appears as long as this main group does not exist yet. |
| Add variable group | Creates main group, middle group and subgroup in one go – including the number of subgroups. The quickest way to a new area. |
Main group and middle group behave like directories, the subgroups below them are the actual variables. They are added individually with the right mouse button on the respective group – New middle group or New subgroup. In the subgroup dialog the number, the comment and the count of variables can be entered, so several consecutive ones are created at once.
The “–” symbol or the Del key deletes the selection. The search field next to it filters the list.
Addresses from the ETS: Existing KNX group addresses can be taken over with the menu Edit – Addresses ODBC Import (ESF/XML). The other way round is Addresses ODBC Export next to it. See KNX ODBC import.
A double click on a variable opens its properties. Several variables can also be selected and edited together with the right mouse button – Properties.
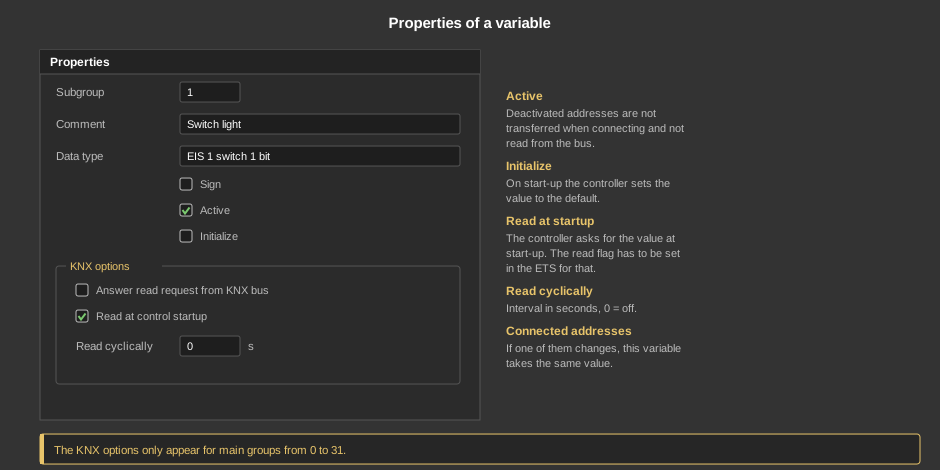
| Subgroup | Number of the subgroup. |
| Comment | Name of the variable. It appears in the diagnostics, in the search and with the links – a meaningful name pays off later on. |
| Data type | The data types are divided into so called EIS types, these are derived from KNX. |
| Sign | The value is evaluated with a sign, so negative values are possible too. |
| Active | Deactivated addresses are not transferred to the controller when connecting and not read from the bus. Parts of an installation can thus be shut down temporarily without deleting them. Several addresses at once are switched with the entries Activate addresses and Deactivate addresses in the context menu. |
| Initialize | On start-up of the controller the value is set to the default. |
KNX optionsThese options are only visible if the main group lies between 0 and 31: |
|
| Answer read request from KNX bus | If another device asks for the value of this group address, the controller answers with its current value. |
| Read at control startup | On start-up a read request is sent to the group address. The read flag has to be set in the ETS for that. |
| Read cyclically | Interval in seconds in which the variable is read cyclically. 0 switches the reading off. |
| Connected group addresses | Further group addresses that are connected to this variable: if one of them changes, this variable takes the same value. An address selected in the tree can be taken over directly with Insert as connected group address; Clean up connected group addresses removes entries that no longer exist. |
The right mouse button in the variable window additionally offers:
At the bottom edge of the window the count of variables of the project is shown.
Via the context menu of a variable the current value of the group address can be sent or read by hand with Send / read value. The entry is only active when a connection to the controller exists (operating mode).
With address monitoring any variables can be combined into groups and watched together. The dialog is opened via the context menu of a variable (Address monitoring…, directly below Send / read value; if addresses are already selected the entry is called Address monitoring+ and takes them along). It stays open non-modally, so work can continue in parallel.
Further variables are dragged from the variable window into the table by drag & drop. Each row shows address, comment and the current value. While the controller is connected the value is updated continuously.
With the buttons + and − several groups can be created or deleted as their own tabs. When creating one a name is asked for.
In the column Control every address can be operated directly from the table:
The waste bin at the end of a row removes an entry, the arrow keys at the top change the order. The compiled groups are stored in the project and are available again the next time it is opened.
All values of the controller are saved regularly, but only once per hour. That is enough for the vast majority of cases. Before a project is transferred the controller additionally saves by itself, so that positions and settings survive the transfer.
The main group 4200 Persistent data is a special case: if a variable from this area changes, it is already stored 10 seconds later. The main group is created via the “+” symbol – New main group for persistent data.
Important: The controller saves to a flash memory that must not be written to an unlimited number of times. This area must therefore not be used for values that change constantly – measured values or counters in a one second cycle, for instance. Constant saving shortens the life of the memory and leads to data loss. For everything else the normal hourly cycle is sufficient.
Many control elements and function blocks need several addresses – a blind for example six. If an even pattern has been kept to in the ETS, it is enough to drag the first address onto the element: the others are calculated from offsets and linked as well.
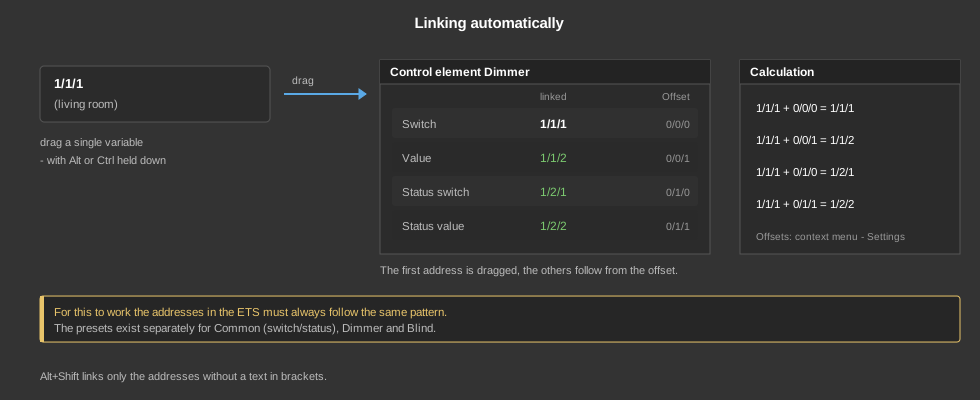
For this the variable is dragged onto the control element with the Alt key held down. This variable is linked as the first address and the text in brackets is taken over as the caption. With Alt+Shift only the variables without a text are linked. This works with the control elements as well as with the function blocks Blind and Dimmer.
Example: if the comment of the variable reads “1L2 (living room left)” and it is dragged onto the control element Blind universal, “living room left” is taken over as the caption and the address is linked as the first one.
The offsets are set with the right mouse button – Settings - Automatic connection. They are divided into three areas:
The offset is added to the dragged address. The first address is usually 0/0/0 and is only included for the overview. Example of a dimmer with the addresses switch 0/0/1, value 0/0/2, status switch 0/1/1 and status value 0/1/2 – the offsets for that are 0/0/0, 0/0/1, 0/1/0 and 0/1/1.
Multiple selection with function blocks: If a variable is dragged without a modifier key onto the input or output of a selected function block while several blocks are selected, it is linked at the same input or output of all selected blocks of the same type. The automatic linking with Alt or Ctrl on the other hand always affects only the block the variable is dragged onto. For details see Program Editor.
A training video on this topic is available under the following link: training video