 Remote access
Remote access
Remote accessAs a presentation: Remote maintenance - an overview on a few slides, also suitable for training (arrow keys to browse, F for full screen).
With remote access, devices from the network of the controller can be reached through a TCP tunnel as if you were sitting in front of them. Via an IP gateway in the same network, KNX devices can also be programmed with the ETS this way. The connection runs over the built-in VPN, port forwarding in the router is not needed.
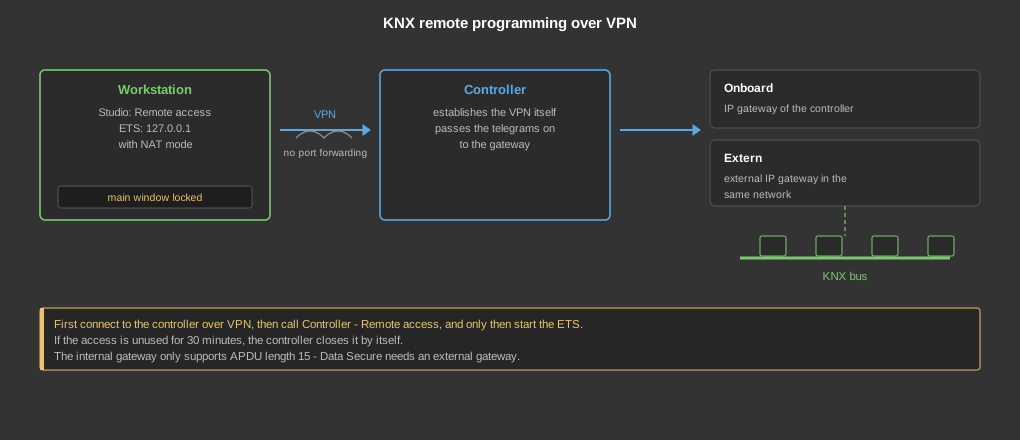
The function is called from the menu Controller – Remote access. It requires an established VPN connection to the controller – over the local network remote programming is not possible.
With the option Activate KNX remote access and a click on Connect the remote programming is started. Two interfaces are available:
In the ETS a connection to the local computer is created: IP address 127.0.0.1, NAT mode switched on. So that the ETS does not switch to another connection by itself, “Use for this project” should be set. KNX devices can then be programmed over this connection.
The internal IP gateway is available from image version 3.0 onwards. For programming with ETS 6.1 or newer the image version of the controller has to be at least 4.011; with older images only an external IP gateway is possible.
The internal IP gateway also only supports the standard APDU length 15. Devices whose download needs longer telegrams – in particular the secure commissioning of KNX Data Secure devices – cannot be programmed through it. The ETS then reports “Insufficient APDU length (limited to 15 by the capabilities of the bus interface)”. For such devices either the secure commissioning has to be switched off in the ETS or an external IP gateway has to be used.
The internal IP gateway is third party software on whose development we have no influence. We have no influence on changes to the ETS either, so the function cannot be guaranteed for future ETS updates.
With a TCP tunnel a device from the remote network of the controller is brought onto your own computer. To access the web interface of an inverter, for instance, a connection with its IP address and port 80 is created.
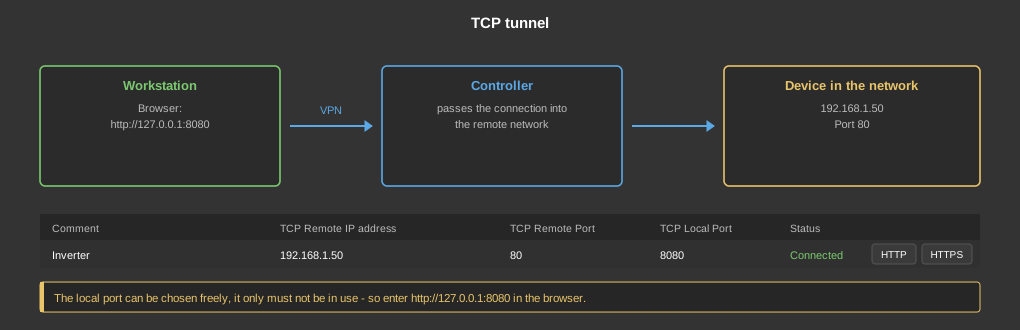
For each tunnel a comment, the TCP Remote IP address, the TCP Remote Port and the TCP Local Port are entered; the column Status shows whether the tunnel is up.
The local port can be chosen freely, it only must not already be in use by another application – otherwise the Studio reports this when connecting. In the example above 8080 is used locally instead of 80, so http://127.0.0.1:8080 has to be entered in the browser.
Tip: Most browsers switch to https by themselves when nothing is specified. If the device only supports http, the connection then does not work – so always state http:// or https://. For easier access the row contains the two buttons HTTP and HTTPS, which open the default browser with the matching address right away.
Important: Please observe the disclaimer when using the VPN service.