 MCP Server (AI Interface)
MCP Server (AI Interface)
MCP Server (AI Interface)
The Studio includes a built-in MCP Server (Model Context Protocol). This allows AI assistants such as Claude Code, Claude Desktop, or ChatGPT to directly access and edit an open project — creating pages, placing widgets, connecting function blocks, managing addresses, and much more.
The MCP Server runs only in Studio mode (not in the App) and listens locally on a configurable TCP port. Two HTTP transports are supported:
POST http://localhost:7420/mcpGET http://localhost:7420/sseFor most AI clients a Python proxy script is used as a bridge (stdio ↔ HTTP), since not all clients support HTTP MCP servers directly.
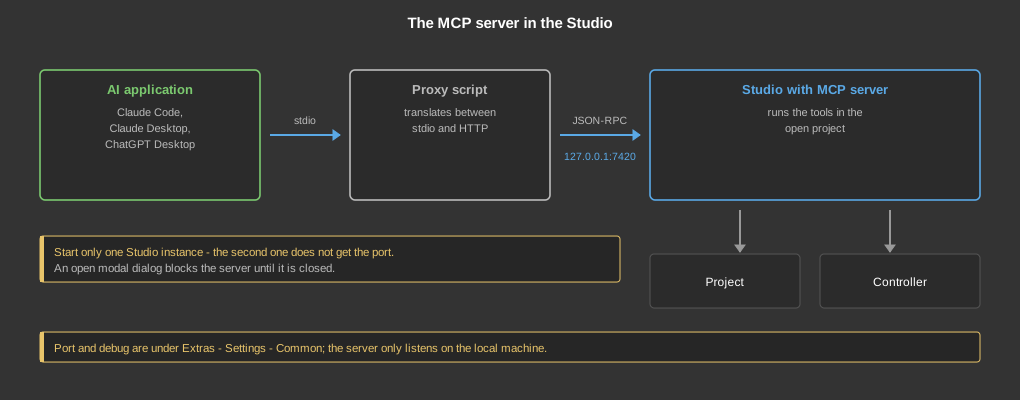
The MCP Server settings are located under Extras → Settings → Tab “General”.
| Setting | Description |
| MCP Server Port | TCP port of the server. Default value: 7420. Value 0 = MCP Server disabled. Changes take effect only after restarting the Studio. |
| MCP Server Debug | Enables or disables debug logging. When set to On, all incoming
connections, method calls and tool invocations are written to the
application log via qInfo(). Takes effect immediately —
no restart required. |
The MCP Server provides a total of 107 tools in 17 groups:
| Tool | Description |
get_project_info |
Get the project's filename, version and timestamp as well as the number of visualization and program pages |
list_widget_pages |
List all visualization pages. With include_summary=true
the widget types are aggregated per page (saves subsequent
get_widget_page calls). |
get_widget_page |
Get details of a visualization page including all its widgets |
add_widget_page |
Create a new visualization page (name, width, height, orientation).
With header_footer=true a header and footer are created at the
same time, as in the project generator; with back_page_guid
the header jumps back to the parent page. |
delete_widget_page |
Delete a visualization page |
add_widget |
Place a widget on a page. Default size is set automatically based on
widget type (e.g. 144×144 for block widgets, 152×40 for text
widgets). Only specify w/h to override the default. |
update_widget |
Change position, size and parameters of a widget |
delete_widget |
Delete a widget |
list_fb_pages |
List all program pages (function block pages). With
include_summary=true the FB types are aggregated per page
(saves subsequent get_fb_page calls). |
get_fb_page |
Get details of a program page including all function blocks |
add_fb_page |
Create a new program page |
add_function_block |
Place a function block on a program page. If the block type supports
“Generate variables”, the KNX addresses are created at the same
time (can be disabled with auto_generate_addresses=false). |
delete_function_block |
Delete a function block |
list_addresses |
Retrieve the KNX address hierarchy. For large projects, narrow down the
response: filter (search term in the comment),
main_group and middle_group. |
save_project |
Save the project to disk |
open_project |
Open a project from disk (path to the .zpro file) |
save_project_as |
Save the project under a new file name (save as) |
new_project |
Create and open a new project — equivalent to File → New,
but with the file name as a parameter. Creates a first program page, two
visualization pages (portrait and landscape) and a default connection
(connection_ip, default 172.31.1.100). An existing file is
only overwritten with overwrite=true. |
| Tool | Description |
get_widget_detail |
Get complete widget data: all parameters with comment, tooltip, value
and type, plus all IO addresses. The parameters that take an image are also
listed in image_params, stating whether the image exists in the
project. For the “Graphic dynamic” control element the image list is
returned as dynamic_images. |
set_widget_addresses |
Set a KNX address for a widget IO slot (index, main group, middle group, sub group) |
get_widget_type_info |
Get name and parameter list of a widget type (static information) |
list_widget_types |
List all known widget types with decimal value, hex value and name.
Use before every add_widget call to determine
the correct type value. |
connect_widget_to_fb |
Connect a block widget to a function block. Automatically sets the
FB-GUID parameter at the correct param index for the widget type.
sync_label=true: widget caption (Param 0) is automatically
copied from the FB comment — saves a subsequent
update_widget call. |
| Tool | Description |
get_fb_detail |
Get complete function block data: GUID, type, type name, comment, position, parameters, inputs and outputs with connection status and addresses |
update_fb |
Change position, comment and parameters of a function block |
get_fb_type_info |
Get the name of a function block type by its numeric type value |
list_fb_types |
Return the complete list of all known function block types with
decimal value, hex value and name. Call this before
add_function_block to look up the correct type
value (e.g. Modbus Master = 1917 = 0x077d). |
| Tool | Description |
connect_fb_io |
Connect an output of one function block to the input of another. Internal connections require no KNX address — they are linked via a shared internal identifier. |
disconnect_fb_io |
Disconnect a connection at a function block input or output |
list_fb_connections |
List all internal and external connections on a program page |
| Tool | Description |
create_address |
Create a new KNX address in the address list (main, middle and sub group, comment, data type). Missing parent groups are created automatically. |
update_address |
Change the comment or data type of an existing address |
delete_address |
Remove an address from the address list |
assign_fb_io_address |
Assign a KNX address to a function block input or output.
For multiple assignments to the same FB:
use assign_fb_io_addresses_batch. |
assign_fb_io_addresses_batch |
Assign multiple KNX addresses in a single API call.
assignments array with
io_type, io_index,
main, middle, sub per entry.
Up to 10× faster than individual calls (e.g. 4 addresses per FB
→ 1 call instead of 4).
Returns: total, succeeded, errors. |
ui_navigate |
Navigate the Studio view to the given page and synchronize the sidebar
and tab display. Fixes the bug where page display and navigation can
get out of sync after API calls. Auto-detects whether the GUID belongs
to an FB page or a widget page.
Returns: found, page_type_detected. |
import_knx_addresses |
Import KNX group addresses from an ESF or XML file (ETS export).
Input: file_path (local path) or
file_content (file content as string — no file access
needed, ideal for sandbox environments). Format is auto-detected.
Options: keep_type, keep_comment,
import_new_only, connected_addresses,
uncertain_1byte/2byte/4byte.
Returns: imported, updated, skipped, total. |
generate_fb_addresses |
Automatically generates KNX addresses for a function block and assigns
them to its inputs and outputs — equivalent to the
“Generate variables” button in the Studio. Works for all
Block FBs (light, blind, switch, scene, RGBW, …) and many common
and heating FBs.
conflict_mode: "append" (default) = use next free
middle group, "overwrite" = replace existing addresses.
Returns: has_generate_variable, addresses_created. |
| Tool | Description |
get_modbus_master_config |
Read the configuration and registers of a Modbus Master function block.
Supports pagination: offset and limit parameters
for large configurations (>50 registers). Each register includes
datatype (readable enum:
INT16/UINT16/INT32/UINT32/FLOAT32)
and word_count (number of 16-bit words). |
set_modbus_master_config |
Change general configuration parameters (node ID, protocol, IP address,
port, timeout …). address_offset is added to every
register address. Convention: addresses are 0-based (FC3/FC4 address 0
= device address 40001/30001). For 1-based devices:
address_offset=-1. |
set_modbus_master_registers |
Replace the complete register list. Recommendation: use
datatype as a string enum
(INT16/UINT16/INT32/UINT32/FLOAT32)
– automatically sets word_count, signed and
internal types. factor accepts decimal values (e.g. 0.01).
Response includes a warnings array listing automatic
corrections. |
add_modbus_master_register |
Add a single register at the end of the list. Reading or writing is
determined by function_code (3/4 = read,
6/16 = write). write_mode only determines when a write
register is sent: 0 = on change, 1 = on start and on
change, 2 = cyclic. |
update_modbus_master_register |
Update an existing register (only supplied fields are changed). Also
supports the datatype shorthand and write_mode. |
delete_modbus_master_register |
Remove a register from the list. Output IOs are automatically resized accordingly. |
| Tool | Description |
list_help_topics |
List all available help topics. Returns topic IDs that can be fetched
with get_help. Topics are grouped by category:
program/fb_xxx for function blocks,
visu/widget_xxx for widgets,
common/variable for data types etc.
Optional parameter: language (de or en). |
get_help |
Retrieve a help page as plain text. Either specify a topic ID
(e.g. program/fb_modbus_master), or reference a placed
function block via fb_guid / widget via widget_guid
– the correct help file is then resolved automatically via
onProcesssHelp() resp. urlHelpBrowser().
Optional parameter: language. |
The Block Clock tools read and write the switching schedules of a Block Clock
function block. Prerequisite: A Widget_Block_Clock must be placed
on a visualization page and connected to the function block
(fb_guid = GUID of the linked block). The schedules are stored
exclusively in the runtime — the schedule tools therefore require a
connection to the runtime and fetch the current state from there before every
change.
| Tool | Description |
get_block_clock_schedules |
Read all schedule entries of a Block Clock FB. Returns
schedules (list), count,
brightness_active and brightness_inactive.
Each entry contains:
type (week / date / astro),
hour, minute, value,
days_sun/mon/tue/wed/thu/fri/sat,
day, month, single_shot,
brightness (always / day / night),
astro_type, astro_offset,
switch_mode (value / active). |
set_block_clock_schedules |
Replace the complete schedule list of a Block Clock FB.
All existing entries are deleted. Optional:
brightness_active and brightness_inactive
(defaults: 1000 / 100). Maximum: 128 entries. |
add_block_clock_schedule |
Add a new schedule entry at the end of the list.
Required fields: fb_guid, type,
hour, minute, value. |
update_block_clock_schedule |
Update an existing schedule entry by its index (0-based). Only specified fields are changed; unspecified fields remain unchanged. |
delete_block_clock_schedule |
Delete a schedule entry by its index (0-based). |
get_block_clock_steps |
Read the step list of a Block Clock widget (parameter “Steps”,
only relevant for type = step). Returns steps as a list of
{value, caption} — value is the switching
value (e.g. 1), caption the label
(e.g. Comfort). |
set_block_clock_steps |
Replace the complete step list of a Block Clock widget. steps
is a list of objects with value and caption,
e.g. [{"value":"1","caption":"Comfort"},{"value":"2","caption":"Night"}]. |
These tools act on the settings inside the control element (light,
dimmer, blind, switch, presence, scene, room controller, irrigation and others)
— not on the standalone clock widget of group 8. The element is always
referenced by the fb_guid of its function block. The values are
stored only in the runtime; all tools therefore require a connection to the
runtime. In the uniPRO Portal a change only appears with the next cycle (up to
60 seconds).
Note on weekdays: Here the days are given as a list days
(1 = Monday … 7 = Sunday), whereas the Block Clock
tools of group 8 use the fields days_mon …
days_sun.
| Tool | Description |
get_block_element_schedules |
Read all schedules of a control element. Returns
element_type, value_semantics (meaning of the
switching values for this block type), count,
max_count and schedules. Fields of an entry:
time (HH:MM), days,
values (raw values) or alternatively action
(on/off/dim/mode) with
value, mode and lamella,
enabled, type
(week/astro/date),
astro, astro_offset, date_day,
date_month, date_action,
single_shot, states (release per house mode)
and brightness_condition
(always/day/night). |
set_block_element_schedules |
Replace the complete schedule list of a control element (maximum 32 entries). All existing entries are deleted. |
add_block_element_schedule |
Add a schedule entry at the end of the list (maximum 32 entries).
Unspecified fields get default values: all weekdays, 00:00, type
week, enabled. |
update_block_element_schedule |
Change an existing schedule entry by its index (0-based). Only specified fields are changed. |
delete_block_element_schedule |
Delete a schedule entry by its index (0-based). |
get_block_element_presence |
Read the presence simulation of a control element. Switch, dimmer,
tunable white and color light return active,
only_dark, begin, end,
count and duration_minutes; the blind returns
active, begin, end,
count, position and position_off.
active is an object {present, absent, vacation}. |
set_block_element_presence |
Change the presence simulation of a control element. Partial updates are allowed: missing fields remain unchanged. |
get_block_element_settings |
Read the settings of a control element:
maintenance_hours (operating hours limit for the maintenance
message, 0 = inactive), brightness_thresholds and
state_values — the values switched when the house mode
changes. For the room controller additionally frost (frost
protection temperature with an open window) and saved_values
(the five quick-select setpoints). The automatic shading of the blind is
not included. |
set_block_element_settings |
Change the settings of a control element. Partial updates are allowed: missing fields remain unchanged. |
get_irrigation_programs |
Read the programs of the Block Irrigation: per program name, active,
day mode, interval, season window, factor, weather consideration and the
run time per zone in minutes (0 = zone does not belong to the
program). Also the zone names, the season factor, the twelve monthly
values and the end of a running rain delay. The start times are returned
by get_block_element_schedules. |
set_irrigation_programs |
Change the programs of the Block Irrigation. Partial updates are
allowed: only the named programs (each entry with its index) and only the
named fields are changed. Zone names, season and monthly values, rain
delay and weather model can also be set. manual triggers
manual operation — the command is executed exactly once. |
These tools manage the connections stored in the project through which the
Studio (and connect_runtime) reaches the controller. After a change
the project must be saved to keep it.
| Tool | Description |
list_connections |
List the project's connections with index, name, IP address or VPN mail, and indicate which one is selected. Passwords are not returned. |
add_connection |
Create a connection and select it — equivalent to the connection
wizard. In the local network ip is sufficient; for a VPN
connection use vpn=true and vpn_email. Without
password the controller's default password applies. |
update_connection |
Change an existing connection by its index. Fields not specified remain unchanged. |
delete_connection |
Remove a connection from the project. The selection moves along, so a valid connection remains selected afterwards. |
select_connection |
Select which connection connect_runtime uses —
equivalent to Online → Select connection. Either by
index or by name. |
These tools establish the connection to the runtime, transfer the program and
send values directly to the connected runtime (e.g. switch lights,
dim, set target temperature). Prerequisite: PT2020-Studio must be connected to a
running runtime via the network connection. Addresses can be found using
list_addresses (fields main, middle,
sub).
| Tool | Description |
|---|---|
connect_runtime |
Establish the connection to the runtime via the project's selected
connection (equivalent to Connect / F11, but without progress dialog) or
disconnect with connect=false. Waits up to
timeout_seconds (default 10) for the result. Returns:
connected, connection, target,
vpn. |
set_play_mode |
Switch between edit mode and operating mode — equivalent to the
play button (F5). When switching on, a changed program is transferred to
the connected runtime and started; only then do newly created function
blocks run. force_transfer=true transfers program and address
list even if no change was detected. Without a runtime connection only
the mode is switched. |
get_play_mode |
Reads whether operating mode is active and whether there is a connection to the runtime. |
write_project_to_controller |
Write the project as boot project to the connected controller
(equivalent to Write project to controller). Required for
everything that belongs to the project data, e.g. the controller list or
the recordings — set_play_mode only transfers program
and address list into working memory. The project on the controller is
replaced. |
get_presence_mode |
Read the controller's house mode: present (0),
absent (1) or vacation (2). The house mode
determines which schedules trigger, whether the presence simulation runs
and which state values are switched. If the project contains no control
element, available is false. |
set_presence_mode |
Switch the controller's house mode — either mode
(present/absent/vacation) or
value (0/1/2). Acts like operating the Presence control
element. Requires a connection to the runtime. |
set_address_value |
Sends a value to a KNX group address of the connected runtime.
Parameters: main, middle, sub,
value (0/1 for switching, 0–100 for dimming,
degrees for temperature). Returns a warning if the runtime is not
connected; in that case the value is stored locally only. |
get_address_value |
Reads the last received or set value of a KNX group address.
Returns value (numeric), value_str (readable),
comment and datatype. |
The list_addresses tool additionally returns value
and value_str for each address entry, making the current state of
all addresses visible at a glance.
A project can run on several controllers. The controller list and the
assignment of program pages belong to the project data and only take effect
after write_project_to_controller.
| Tool | Description |
get_controller_list |
Read the project's controller list. Returns: controllers,
count, main_index,
project_generation. |
set_controller_list |
Replace the project's controller list. An empty list turns it back into
an ordinary single-controller project. Exactly one controller carries
is_main — it runs all pages that are not assigned to a
specific controller; if not specified, the first one becomes the main
controller. |
set_fb_page_controller |
Define which controller runs a program page (page_guid,
controller_index from the controller list). A page always
runs on exactly one controller. The current assignment is shown by
list_fb_pages under controller_index. |
get_controller_status |
Query the live status of the federation from the connected controller:
per controller its state (connected, unreachable, standby …),
seconds since the last message, runtime version, project state
(generation) and the result of the last project distribution.
A lower generation means that the controller was unreachable
during the download — it fetches the project itself the next time it
connects. |
set_controller_index |
Set the own number of the connected controller, or only query it
without index. The number is stored on the controller, not in
the project; 0 means “no number” — the controller then
runs nothing as soon as the project contains a controller list. With
target the number of another controller of the federation is
set; the request is forwarded via the connected controller. |
| Tool | Description |
get_diagnostic_messages |
Read the diagnostic messages of the connected controller — the
same lines as in the Studio's diagnostic display. Channels:
messages, errors, telegrams,
knx, modbus_master, modbus_slave,
mqtt, mbus, m2020, can.
Options: max (default 100), filter,
wait_seconds (wait up to 30 s for a matching line),
clear. Returns: columns, rows,
matched, total. |
set_diagnostic_capture |
Enable or disable a diagnostic channel on the controller. Messages and
errors are always sent; all other channels are only sent by the
controller once enabled. all handles all channels at once.
Typical sequence: enable, trigger the action, read
get_diagnostic_messages with wait_seconds,
disable again. |
set_debug_level |
Set the verbosity of the controller's messages: 0 = important
messages only, 1 = all messages. Applies until the controller
restarts; permanently the value is set in pt2020rt.cfg under
debug_level. |
These tools edit the project's recordings (menu Recording). They belong to the
project data and only take effect on the controller after
write_project_to_controller.
| Tool | Description |
get_statistic_recordings |
List the recordings: per entry name, KNX address, group, trigger and,
in a controller federation, the recording controller. If the dialog is
open in the Studio, dialog_open is true — changes would
then be overwritten when it is closed. |
add_statistic_recording |
Create a recording. address is required
(main/middle/sub); without name the address is
used. Trigger via trigger_type (telegram,
change, time, time_and_change) with
trigger_value and time grid; also
controller_index, tab (group) and
write_only. |
update_statistic_recording |
Change an existing recording by its index. Only specified fields are changed. |
delete_statistic_recording |
Remove a recording from the project. Values already recorded in the controller's database are kept. |
These tools allow writing and reading Lua script code for the Lua Interpreter
function block (type 0x0384). The get_lua_api_reference tool returns
the complete API reference including callbacks, IO variables and all
sys_* functions — enabling the AI assistant to generate correct
Lua code directly.
| Tool | Description |
set_lua_script |
Writes Lua source code into a Lua Interpreter function block. Parameters:
fb_guid (GUID of the block), code (Lua source text),
optional inputs (1–64, number of inputs),
outputs (1–64, number of outputs). |
get_lua_api_reference |
Returns the complete Lua API reference: callbacks
(onCreate, onInputChanged, onTimerEvent…,
onEvent), IO variables (E1–E64,
A1–A64), all sys_* functions
grouped by category (Timer, KNX, Persistence, Network, PID, System …)
and a complete blink example. No parameters required. |
The project has exactly 20 fixed style slots (designs of the visualization,
index 0–19). A new style is created by filling a free slot. Colors are
given in the format #rrggbb.
| Tool | Description |
list_styles |
List all 20 style slots: index, name,
active (slot configured), is_current (currently
active style), icon_theme and base colors. |
get_style_detail |
Get all settings of a style slot: base colors, icon theme, popup dialog,
block (with header and footer), image frame and the page settings
(pages). The field names match the parameters of
update_style. |
update_style |
Change a style slot — only the supplied fields are written. To
create a new style, fill a free slot with name and
active=1. Image fields expect an image file name (see
list_style_images), empty string = no image. With
activate=true the style becomes active immediately. Not
possible while the style editor is open in the Studio. |
update_style_page |
Change the page settings of a style slot (enabled,
background_color, image_background,
image_overlay). Without page_guid all
visualization pages are changed. |
apply_style_template |
Fill a style slot completely with a built-in template and set it active,
e.g. light, dark, wood,
metal, stone_bright, stone_dark,
stone_marmor. Individual fields can then be adjusted with
update_style. |
set_active_style |
Activate a style slot (0–19, the slot must be configured) or switch
back to the look without style with -1. The visualization is
redrawn immediately. |
list_style_images |
List the image file names that can be used in style image fields:
project_images (images of the project) and
builtin_images (built-in template backgrounds). The
project_images can also be assigned to control elements. |
add_project_image |
Copy an image file (png, jpg, gif, svg) into the project resources –
from the local file system (file_path) or as Base64 content
(data_base64 with name, at most 10 MB). It can
then be used in styles and widgets. The file name is cleaned up (lower case,
no umlauts or special characters); the returned name is the valid one. |
set_widget_image |
Assign an image to a control element. The image must exist in the
project; with file_path it is imported first. If the control
element has several image parameters (e.g. image on/off), select the one
you want with param_index. An empty name removes the image. For
“Graphic dynamic” pass the list images with value range
(from, to) and image instead. |
These tools use the rule set of the project generator: a room structure (floor → room → element → address) is derived from the group addresses, corrected, and the project is generated from it. Individual room elements can also be created directly.
| Tool | Description |
derive_project_structure |
Derive the room structure from the group addresses and save it in the
project — the same derivation as in the wizard. The result is a
proposal that is corrected with set_project_structure and
generated with run_project_generator. Addresses are only
returned with include_addresses=true; filter large projects
by floor/room or page with
offset/limit. |
get_project_structure |
Read the room structure saved in the project. If none exists yet, call
derive_project_structure or set_project_structure
first. Filtering and paging as with
derive_project_structure. |
set_project_structure |
Write a corrected room structure to the project; nothing is generated.
The tree is always replaced completely — so first read it with
get_project_structure (include_addresses=true),
change it and write it back. If anything is rejected, the project remains
unchanged and the response lists all findings. |
run_project_generator |
Generate function blocks, visualization pages, widgets and navigation
from the saved room structure — the same run as the last step of the
wizard. Always call with dry_run=true first: this
returns the counts and the already existing pages without changing
anything. The run cannot be undone; the project is saved beforehand
(save_before, default true). Existing group addresses are
linked, but no new ones are created. |
add_block_element |
Create a complete room element in one call: function block, internal
variables, KNX addresses on the matching IOs, widget on the visualization
page and the link between them. Replaces the chain
add_function_block → generate_fb_addresses
→ add_widget → connect_widget_to_fb.
Without x/y the first free grid cell of the page
is used. |
add_block_elements |
Create several room elements in one call — the same sequence as
add_block_element per element. If one element fails, the
others are still created. Returns: total,
succeeded, results, errors. |
arrange_widgets |
Rearrange the widgets of a visualization page in the grid instead of
moving each one with update_widget. Tile size and number of
columns come from the page grid of the project generator and can be
overridden. The widget size remains unchanged unless
tile_w/tile_h are specified; header and footer
are left untouched by default. |
Claude Code is the AI command-line tool from Anthropic. Integration
is done via the Python proxy script and the claude mcp add command.
uni_pro_mcp_proxy.py in a convenient
location (e.g. C:\Users\<user>\)The script forwards stdio messages to the Studio's HTTP MCP server:
import sys, json, urllib.request, urllib.error

MCP_URL = "http://localhost:7420/mcp"

def send_error(id_, msg):
    sys.stdout.write(json.dumps({"jsonrpc":"2.0","id":id_,"error":{"code":-32603,"message":msg}})+"\n")
    sys.stdout.flush()

def main():
    for line in sys.stdin:
        line = line.strip()
        if not line: continue
        try: id_ = json.loads(line).get("id")
        except: id_ = None
        try:
            req = urllib.request.Request(MCP_URL, data=line.encode(), headers={"Content-Type":"application/json"})
            with urllib.request.urlopen(req, timeout=10) as r:
                body = r.read().decode().strip()
                if body and body != "{}":
                    sys.stdout.write(body+"\n"); sys.stdout.flush()
        except urllib.error.URLError as e: send_error(id_, "Studio not reachable: "+str(e.reason))
        except Exception as e: send_error(id_, str(e))

if __name__ == "__main__": main()
Run once in a terminal (replaces manual settings.json configuration):
claude mcp add --scope user uni-pro python "C:/Users/<user>/uni_pro_mcp_proxy.py"
claude./mcp — uni-pro should appear as connected.
Claude Desktop is the desktop application from Anthropic. The configuration file is located at:
%APPDATA%\Claude\claude_desktop_config.json~/Library/Application Support/Claude/claude_desktop_config.jsonAdd the following section to the configuration file:
{
  "mcpServers": {
    "uni-pro": {
      "command": "python",
      "args": ["C:/Users/<user>/uni_pro_mcp_proxy.py"]
    }
  }
}
Restart Claude Desktop. A tool icon will appear in the chat input field — clicking it shows the available MCP tools.
Note: The Studio must be started before Claude Desktop so the proxy can reach the HTTP server on the first connection attempt.
ChatGPT Desktop (Windows/macOS) also supports MCP servers via the stdio proxy script.
pythonC:/Users/<user>/uni_pro_mcp_proxy.pyuni-proNote: The exact configuration depends on the installed version of ChatGPT Desktop. Current information is available in the OpenAI documentation.
The connection can be tested directly from the command line using curl, without any AI application. Open a Command Prompt and run the following commands (Studio must be running):
curl -X POST http://localhost:7420/mcp ^
  -H "Content-Type: application/json" ^
  -d "{\"jsonrpc\":\"2.0\",\"id\":1,\"method\":\"initialize\",\"params\":{\"protocolVersion\":\"2024-11-05\",\"capabilities\":{},\"clientInfo\":{\"name\":\"test\",\"version\":\"0\"}}}"
Expected response (abbreviated):
{"jsonrpc":"2.0","id":1,"result":{"serverInfo":{"name":"PT2020-Studio-MCP","version":"1.0"},...}}
curl -X POST http://localhost:7420/mcp ^
  -H "Content-Type: application/json" ^
  -d "{\"jsonrpc\":\"2.0\",\"id\":2,\"method\":\"tools/list\",\"params\":{}}"
curl -X POST http://localhost:7420/mcp ^
  -H "Content-Type: application/json" ^
  -d "{\"jsonrpc\":\"2.0\",\"id\":3,\"method\":\"tools/call\",\"params\":{\"name\":\"get_project_info\",\"arguments\":{}}}"
Tip: On Windows, curl is available from the Command
Prompt starting with Windows 10 (Build 1803).
The following examples show typical requests you can ask the AI assistant. The assistant automatically calls the appropriate MCP tools.
"What visualization pages does the current project have?"
"Show me all KNX addresses in the project."
"What is the project name and which version is being used?"
"Create a new visualization page called 'Main Menu' with a size of 1024×768 pixels."
"Create three pages: 'Ground Floor', 'First Floor' and 'Basement', each 1280×800 pixels."
"Add a button (type 100) labeled 'Light On' to the top left of the 'Main Menu' page, 200×80 pixels."
"Place four switches side by side on the 'Ground Floor' page, each 150×60 pixels, for the living room blinds."
"Move the button with ID 42 on the 'Main Menu' page to the bottom right (position 800, 600)."
"Show me all parameters and addresses of widget ID 15 on the 'Ground Floor' page."
"Assign KNX address 1/2/10 to the first IO slot of widget 15."
"Create a new program page called 'Lighting Control' and add an AND function block and a timer."
"What function blocks are on the 'Heating' page?"
"Show me all parameters and inputs of the function block with GUID 'abc-123'."
"Connect output 0 of the AND block to input 0 of the timer on the 'Lighting Control' page."
"What connections exist on the 'Lighting Control' program page?"
"Disconnect the connection at input 0 of the timer."
"Set the comment of function block 'abc-123' to 'Checks presence and brightness'."
"Create a new KNX address 1/2/50 with the comment 'Living Room Light'."
"Update the comment of address 1/2/50 to 'Living Room Main Light'."
"Delete address 1/2/99 from the address list."
"Assign KNX address 1/2/50 to output 0 of function block 'abc-123'."
"Are all KNX addresses in the project assigned? List any unused addresses."
"Analyze the structure of all visualization pages and create an overview of the widget types used."
"Check all function blocks on the 'Heating' page for unconnected inputs and outputs."
"Copy the layout of the 'Ground Floor' page and create a new 'First Floor' page with the same widget positions."
"Save the project."
"Apply all changes and then save the project."
claude mcp add command only needs to be run once.MCP_URL = "http://localhost:7421/mcp").localhost
(127.0.0.1) — no firewall rules are needed.